Render Engines
Offline Rendering
Render engines meant for offline rendering don’t rely on speed, rather the goal is to, get the best possible result albeit in a somewhat reasonable time. It’s used to render portfolio pieces, for example.
Real-time Rendering
Render engines that excel at real-time rendering have to be able to fluently render entire scenes at high frame rates and still feel snappy with player input, while also not forfeiting graphical fidelity.
Showcase Rendering
These render engines need to be extremely portable so they can easily be shared with clients and employers though either their browser or a file which is easy to open and only has the essential controls. Some good features that a showcase renderer should have are:
- Basic navigation controls
- Show wireframe
- Texture map isolation
- Show model statistics like tris count
- Light rotate
- Multiple cameras with a camera switching system
- Camera rotation and zoom limiting
- Controls for starting, stopping and scrubbing through and animation as well as being able to change the playback speed and cycle through different animation sets
- The ability to display post effects like vignette or chromatic aberration
- A section in the file for the name of the project, one’s own name and a link to one’s portfolio
Software Screenshots Having screenshots of the project in software is a very good way to convey that a model is fully game ready and modular / easy to adapt, as well as making it clear that you are comfterbal in that software
| Render Engines | Offline Rendering | Real-time Rendering | Showcase Rendering |
|---|---|---|---|
| Marmoset Toolbag | ✅ Very Good | ✅Very Good | Ok |
| Marmoset Viewer | - | - | ✅ Very Good |
| Unreal Engine | ✅ Very Good | ✅ Very Good | Ok |
| Blender (Eevee / Cycles X) | Good | ❌ Bad | Ok |
| Sketchfab | - | Good | ✅ Very Good |
| Substance Painter | Ok | Ok | Ok |
| Fusion | |||
| Arnold | |||
| Nuke | |||
| Maya | |||
| RenderMan |
Marmoset rendering
- Best for single characters and props, not that good for bigger environments
- Not that good for complex lighting setups
- Amazing showcase via Marmoset Viewer
Marmoset Viewer:
- Some sites like ArtStation support the Marmoset Viewer API allowing for the 3D model to be viewed in the browser
- The recipient needs to download a file and the Marmoset Viewer software
Unreal Engine rendering
- Great for characters and props as well as big environments
- Very good for complex lighting setups andd ussing things like shadow catchers
- The single best showcase for the simple reason that if people see it runs properly in a game engine they know it’s well optimized
Sketchfab rendering
- Not good for complex lighting and environments can only handle smaller things
- Models can be shared with just a link
Blender rendering
A good option for artworks.
Things to Showcase
ToDo: link some example portfolios
These are some ideas of what one could include in one’s portfolio showcase.
- Screenshot of Unreal Engine to show that it’s fully game ready
- Screenshot of layer stack in Substance Painter to show that the textures can easily be adapted
- Screenshots of node setups in Substance Designer or the compositor as long as they are somewhat complex / relevant
- Screenshot of the project in the modeling software (make sure outlier is nice and organized). This can show things like baking groups. I recommend doing this more so if Maya was used and maybe not with Blender
- Screenshot of the high detail mesh in ZBrush. This is less needed and maybe not even representative of the final high as one might have done changes to the model in the modeling software
- Screenshot or render of the model with UV checker maps
- Screenshot of the character’s game rig or control rig and maybe some weight painting. What one could also do is record a quick video of putting the character into different poses to showcase the weight paint
- One the main cover render itself one could add an Unreal Engine or Marmoset Toolbag logo watermark as long as it was actually rendered in that software. Artists often do this to show that a model is game ready or in general to show that they are experienced and know what their doing, as many beginner artists will opt to using the modeling software built-in renders (I’m not saying that the built-in renders aren’t good or don’t have their purpose, but that’s the general stigma. An employer will most likely think more of a render if it has an Unreal or Marmoset watermark).
- An idle animation or any kind of slight movement to make the character feel more dynamic and interesting (of course if one is good at animating, then making a small animation is even better)
Render Resolution & Aspect Ratio
Firstly, one should look at what device will be viewing the art. Most displays of PCs, laptops, phones, TVs except for tablets, will have an aspect ratio of exactly 16:9 or be close to that ratio (Most tablets have an aspect ratio of 4:3).
This means that when rendering, it’s good to stick with one of these 16:9 resolutions.
- 1280x720 (HD)
- 1920 x 1080 (2k / Full HD)
- 2560 x 1440 (QHD / WQHD)
- 3840 x 2160 (4k / Ultra HD)
- 7680 x 4320 (8k / Ultra HD)
(H=High, D=Definition, Q=Quad, W=Widescreen (a meaningless letter added for marketing purposes))
Then it’s important to look at what resolutions are even supported by sites. Mostly you’ll want to render in your desired resolution and then downscale it to meet the resolution requirements set by the website one is uploading it to.
| - | ArtStation | ArtStation Pro | Sketchfab | YouTube |
|---|---|---|---|---|
| Max size | 10mb | - | ||
| Max resolution | 400 x 400 - 1920 x 1080 | 400 x 400 - 10k x 10k | 8k | |
| Max clip resolution | 2k | 4k | - | - |
| Max clip length | 1 min | 1 min | - | - |
| Max MarmosetViewer size | 15mb | 50mb | - | |
| YouTube iframe | yes | yes | - |
Your final art pieces renders should mostly not exceed 3840 × 2160 (this obviously totally depends on the situation, like if one wants to be able to use the art work on posters or 8K displays as a background). But for showcases, renders with higher resolutions are fine, so one can zoom in to see more details.
Note that even though an aspect ratio of 16:9 is good as a default, choosing the aspect ratio is an artistic choice in itself. For a landscape one would maybe want a more wide image, or if one is showcasing details of a character’s armor, a square aspect ratio could look nice and better suit the purpose.
Lastly, there’s a trick to circumvent resolution caps websites set for uploading art. By splitting the image into 2 or more commonly 3 parts, and displaying them above each other, one gets far more resolution with the downside of small gaps in between the images (this works best with portrait oriented images).
Here’s ArtStation’s take on it, and as they say don’t use this method if you just want the image to display big, but if you want to be able to upload higher resolution images.
To achieve this split art work style, the resolutions would look like this:
- 5760 x 3240 (3 times 1920 x 1080 on top of each other)
- 7680 x 4320 (3 times 2560 x 1440 on top of each other)
- 5400 X 9600 (3 times 1800 x 3200 on top of each other)
- 11520 x 6480 (3 times 3840 x 2160 on top of each other)
Turntable Animation Rendering
Turntable animations are a looping animation where a character does one full turn in a circle, perfectly looping back to the first frame. One could directly render out a video, but it’s better to let the renderer render every frame as a separate image, so that if it crashes while rendering one doesn’t have to start from the beginning again. Then, after all frames are rendered into a folder, one can stitch them together again.
When animating the rotation, it’s important to make sure that the keyframe interpolation mode is set properly. In Blender for example, per default the animations has easing at the start and end (to fix in Blender: Keyframe Interpolation Mode > Linear). Also, make sure to start at frame 1 and not frame 0.
The amount of frames the animation should have depends on the duration that one full turn should take and the frame rate the animation will be rendered at:
| 24 fps | 30 fps | 60 fps | |
|---|---|---|---|
| 4 sec | 96 | 120 | 240 |
| 5 sec | 120 | 150 | 300 |
| 6 sec | 144 | 180 | 360 |
| 7 sec | 168 | 210 | 420 |
| 8 sec | 192 | 240 | 480 |
Animation Rendering
To-Do
Wireframe Rendering
Wireframe can either be pre rendered into the image or toggled in real-time renderer. The 3 best options for both offline rendering and real-time rendering wireframe is Marmoset Toolbag, Blender And Unreal Engine. I personally find Marmoset Toolbag / Unreal Engine best for real-time wireframe showcase and Blender / Marmoset Toolbag best for pre rendered wireframe showcase.
Marmoset Toolbag wireframe rendering
To-Do
Blender wireframe rendering
Blender doesn’t actually have a proper way of rendering wireframe, but there’s a hacky solution of using freestyle edges
- Mark all edges as freestyle edges
- Toggle only edge mark
- Decrease thickness
- Toggle freestyle edges in the render settings
- Configure freestyle edges render settings until you like the wireframe output (e.g. line thickness, line color, line opacity)
Unreal Engine wireframe rendering
To-Do
Render Passes
To-Do
Rendering in Blender
Good Blender add-ons for rendering:
Rendering all cameras with one click (Blender)
- Make camera active camera (Ctrl + 0)
- Place marker at desired frame in timeline (M)
- Bind active camera to marker (Ctrl + B)
- Repeat for all cameras on following frames
Rendering Bloom (Blender)
This is a viable way of doing it, but often it’s better to add bloom during post processing in the compositing software instead.
To-Do: Explain why EXR file format best for rendering bloom
Take into consideration that working with EXR files, especially Multilayer EXR is very advanced and should only be used if one is a bit more experienced. It comes with the benefit of more artistic control.
The workflow
- Toggle background transparency (Render > Film > Transparent)
- Set render output as Open EXR with RGBA, Float (full), PIZ / ZIP / DWAA
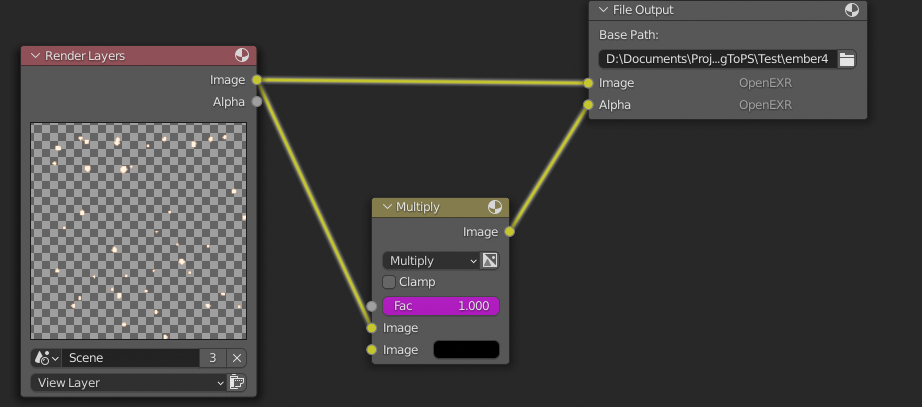
- In the compositor output 2 EXRs, one with the image with a black background and one with transparency. Like in this node setup (renders 2 EXR files):
- Pull the color EXR into PS with default EXR IO settings and split alpha on
- Delete the A layer
- Then Pull in the alpha EXR into PS with default EXR IO settings and split alpha off
- Now bring both together
- The color EXR has to have Linear Dodge(Add) blending mode and has to be above the alpha EXR
- Finally put an exposure adjustment layer at the top and make Gamma Correction 0.51, because this is a 32 bit image Photoshop will not be smart enough to make things look correctly, so this layer always has to be at the top
**Extra Info: **
- Converting the image mode to 16 bit will remove all EXR features so while working it should stay at 32 bit
- I’ve noticed that bloom can be more dominant than it was in the render
Eevee Render Settings (Blender)
- Background Transparency on
- Bloom off (only turn it off right before rendering)
Color Management
Setting Value Display Device SRGB View Transform Filmic (more realistic and greater color range) Exposure 0 Gamma 1 Sequencer sRGB / Linear
Render Passes
Pass Use Explanation Combined yes All render passes Z / Depth yes Great for atmospherics, volumetrics and object blending. Mist pass is the same as z/depth pass, just that the z/depth pass isn’t configurable while the mist pass is. Mist pass depth adjustments in world panel, set start to 0 m and depth to the farthest point in scene. Also, z / depth pass isn’t anti aliased Mist yes (Same as Z / Depth) Normal no Diffuse / Specular depends Volume Light Transmittance - Only needed when using volumetrics Scatter - Only needed when using volumetrics Emission yes Makes adding post bloom very easy and accurate Environment no Very similar to alpha pass Shadow yes Making shadows softer, essential when blending many renders Ambient Occlusion yes Add depth to image Bloom no Good for underwater scenes Cryptomatte no
Render Output
Setting Value Output path Keep empty File Format OpenEXR Multilayer Color RGBA Color Depth Float (Full) Codec PIZ / ZIP(lossless) or DWAA (lossy), DWAA is one of the smallest image formats and looks almost identical to the lossless EXR codecs
Rendering in Marmoset Toolbag
Rendering with Marmoset Real-time Viewer
To-Do
In Marmoset, one can either offline render shots or go the real-time route with Marmoset Viewer.
- Add a camera, the camera location will be the default viewport view
- Adjust render settings. They are available in the camera tab, Lens and Post Effects but also in export tab. Note that some settings won’t carry over into the viewer file, like chromatic aberration