Overview
Texture maps are commonly referred to as “map”, “skin”, “atlas” or “trim sheet”.
These textures are for the PBR metallic workflow. This texture workflow has replaced the outdated specular workflow. The specular workflow shouldn’t be used however when using materials one can still come across this outdated workflow, so it isn’t bad to know how it works, it also is quite easy to convert a specular workflow material to a metallic workflow material.
Maps
Base Color Map
Known as Color, Base Color, Albedo, Diffuse Contains sRGB colors Controls All the base colors More info Use multiply and hue / saturation value nodes Color space sRGB
Metallic Map
Known as Metallic, Metalness, Metal, Albedo (Metal) Contains Gray scale Controls Reflectiveness More info White is fully metallic and black isn’t metallic Color space
Roughness Map
Known as Roughness, Glossy (inverted), Smoothness (inverted), Micro Surface Contains Gray scale Controls More info White is rough and black is shiny Color space Non-color
Normal Map
Known as Normal Contains Vectors and Offsets Controls Controls the Normals X, Y & Z (vector) values per pixel More info Alters the shading and thus can fake detail Color space Linear, Non-color
Ambient Occlusion Map
Known as AO, Ambient Occlusion, Occlusion Contains Controls Lighting info More info Used in game engines, the AO map can be combined with the albedo map
Opacity Map
Known as Opacity, Alpha, Transparency Controls Alpha black is transparent and white is opaque or when the texture has alpha then alpha is transparent and no alpha is opaque. More info Color space Non-color
Emission Map
Known as Emission, Emissive, Glow, Self-illumination Controls More info Color space
Subsurface Scattering Map
Known as Subsurface Scattering, SSS, Blood map, Vein map Contains Controls More info Subsurface Scattering maps fake the behavior of light bounce inside a semitranslucent surface, such as skin or wax. Color space
Subdermal Map
Known as Subdermal, Blood map, Vein map, Skin shaders Contains Controls More info Subdermal maps are used in skin shaders, representing the layer underneath skin: fatty tissue, blood tone and blood vessels. Color space
Utility Maps
Mask
Known as Mask, Control map, Utility map Contains grayscale or only black and white (Depending on the purpose) Controls It has no set purpose, can control anything More info It can be used for many things like for example and alpha map with only a black and white state that decides if something is rendered, or for tattoos/body paint. Color space Non-color
Color ID
Known as Color ID, Object ID, Material ID, ID
Curvature
Thickness
Position
Unused Maps
Diffuse Map
Known as Diffuse, Diffuse Albedo Controls All base colors and shading More info Outdated map, was split into Albedo map and ambient occlusion map
Specular
|More info|Outdated map, was used with the specular workflow, which has been retired by the metallic workflow
Bump Map
Known as Height, Displacement, Bump Contains Gray scale Controls High and low points of geometry(white high, black low) More info Has 3 workflows. Bump Normal, Bump Sub D, Bump displacement. Bump Normal: Best performance but flat
Bump Sub D: Worse performance alters geo
Bump displacement: Alters geo looks best but terrible render times. Can be combined with normal map. Only use when making displacement through mixing noise.
You should only ever use bump maps if you are using pre-made textures which are bump.
Video on the 3 bump methods: https://youtu.be/_dU3DONwSzU
🚧Work in Progress🚧
The making of texture maps
Res: 512, 1024, 2048, 4096, 8192
- Painting: Substance Painter, Quixel Mixer, Marmoset Toolbag, 3D Coat, PS/CSP/…, Blender texture painting
- Procedural: Substance Designer, Blender nodes, Material Maker
- Other: Materialize, Marmoset Toolbag
Making Base Color Map using a photography
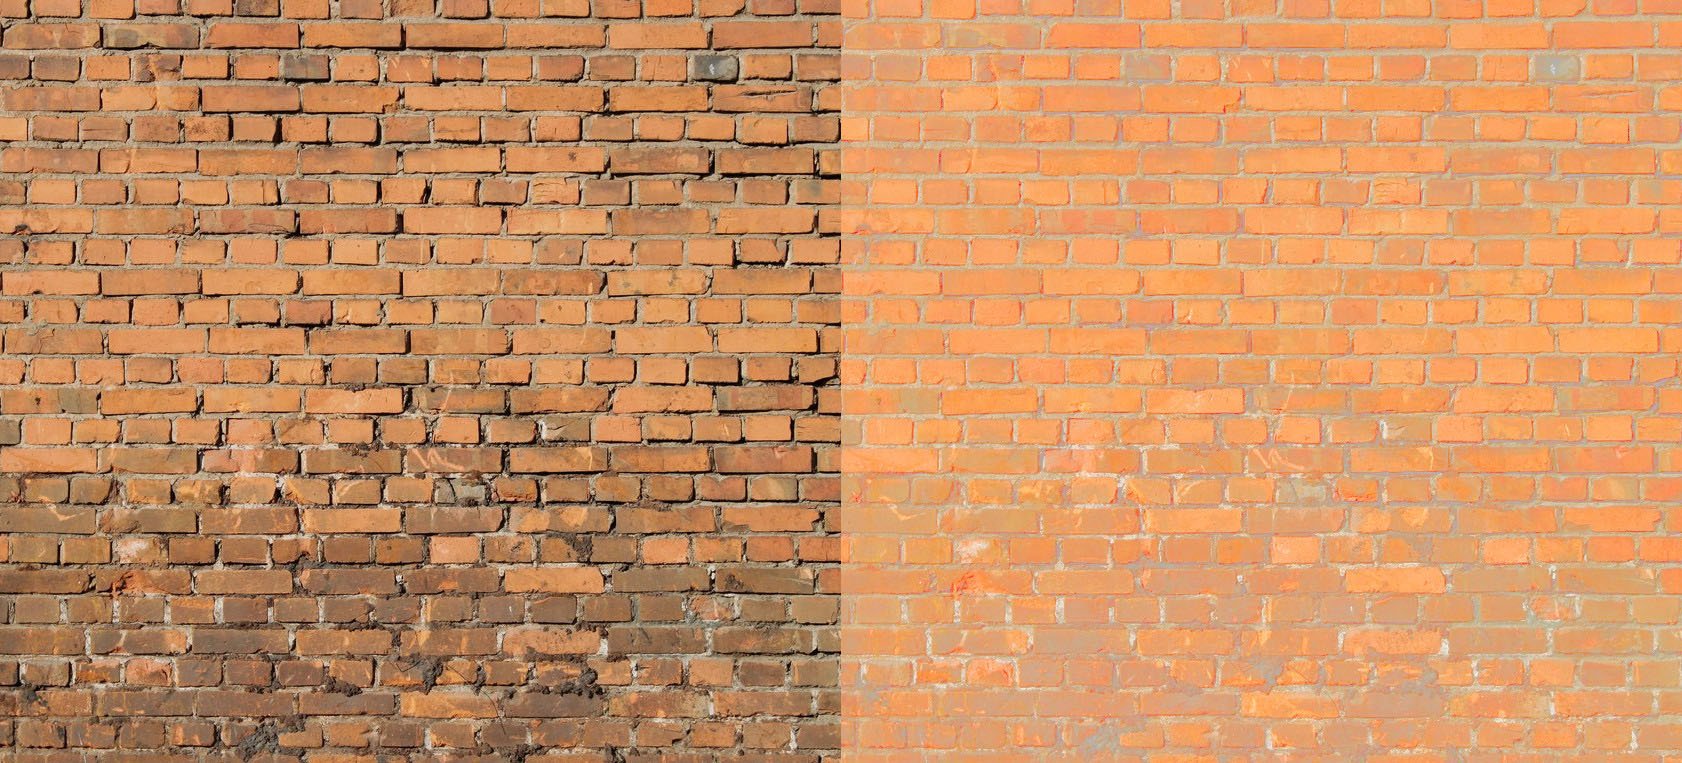
The color map shouldn’t contain any shadows or ambient occlusion. Every photograph contains this, so the first step is to remove them.
Example:
Left Bad | Right Good

Removal method 1
- Make an inverted Luminance Map of the Image, Desaturate it and invert it.
- Clone the layer and use the “Soft Light” blend mode on that layer.
Removal method 2
Making Base Color Map
- Chose a resolution (That has a factor of 2: 1, 2, 4,…)
- UV unwrap the object