1. Install uefy Add-on / Script
Download the free uefy lite version python script or paid uefy pro version python add-on. For the pro version simply install the add-on (version 2.5 and up needed). This will create a new panel called Uefy Script Panel located in the Object Data Properties tab. For the lite version, open it in the scripting tab and click run. It’ll create the same panel but with less functionality. It’s important to know that the light version doesn’t dynamically update, so if after running the script the control rig was renamed, the script has to be run again. This process will be possible with both lite and pro, however at some points some more manual effort will be needed with the lite version, when those spots come I’ll describe how to do it both with pro and lite.
Rigify add-on is also needed, but it’s shipped with Blender. If it isn’t already enabled, then enable it.
2. TODO: Fill the Blender part
3. Import into Unreal Engine
- Skeleton: If this is the first character with this type of rig,
don't select skeleton. For every other character that has that same skeleton,select that previously imported skeleton. (If you bring in let’s say a new race with 4 arms, then for the first character of that race, select no skeleton. After that select the previously imported 4 arm skeleton for every 4 arm character) - Skeletal Mesh: Only
falsewhen “Skeleton” has a skeleton selected, otherwisetrue - Import Mesh:
true - Import Animation:
false
4. Quick Clean Up
Inside the CharacterX folder, create following folders: Meshes Rigs Materials Textures
- Put the imported Skeletal Mesh, Physics Asset and Skeleton into the
Meshesfolder - Put the imported materials into the
Materialsfolder - Pull in all textures from the file explorer to the
Texturesfolder
5. Create Control Rig Blueprint
- Inside the
Rigsfolder, create a newControl Rig(RMB>Animation>Control Rig) - Rename the
Control RigtoCharacterName_ControlRig - Open the
Control Rig - Click
Import Hierarchyand select the correspondingSkeletal Meshthat was just imported (sometimes the skeletal mesh isn’t selectable, this makes little sense, nut re-importing can fix it) - Compile, save and close the
Control Rig
6. Create Procedural Control Rig Blueprint
- Get the
Procedural Control RigcalledCR_Mannequin_Proceduralfrom the Unreal Engine 5 third person starter project (All>Content>Characters>Mannequins>Rigs). And bring a copy of it back to yourRigsfolder - Rename the
Procedural Control RigtoCharacterName_Procedural_ControlRig - Open the
Procedural Control Rig - Under Preview Scene > Mesh select the corresponding
Skeletal Meshthat was just imported - Repeat following changes across all blocks of BP nodes as often as they occur (Ctrl + F can help)
- In all nodes called
To Swing & Twistchange the values toX=0/Y=1/Z=0 - There will always be 2 nodes called
Interpolatebeside each other. Change the left ones value to0.0and the right ones value to0.5
- In all nodes called
- Save and close the
Procedural Control Rig
7. Create Post Process Animation Blueprint
- Inside the
Rigsfolder, create a newAnimation Blueprintand select the correspondingskeletonthat was just imported(RMB>Animation>Animation Blueprint) - Rename the
Post Process AnimationBP toCharacterName_Post_Process_AnimBP - Open the
Post Process AnimationBP - Add following nodes:
- Input Pose node
- Control Rig node. In the Details panel of this node under Control Rig, select the corresponding
Procedural Control Rigthat was just created - Then connect the nodes like so: Input Pose > Control Rig > Output Pose
- Compile, save and close the
Post Process AnimationBP
8. Skeletal Mesh Settings
- Open
Skeletal Mesh - In Asset Details > Animation Rig, set
Default Animation Rigto the correspondingControl Rigthat was just created - In Asset Details > Skeletal Mesh, set
Post Process Animation Blueprintto the correspondingPost Process Animationthat was just created - Switch to
Skeleton Treetab - Under cog wheel enable
Show Retargeting Options - Switch Translation Retargeting Mode of bones:
- Right click root and click
Recursively Set Translation Retargeting Skeleton - Set
rootbone back toAnimationmode - Set
pelvisbone toAnimation Scaledmode
- Right click root and click
- Switch to Skeleton mode (top right) and make sure the correct
Skeletonis selected under Preview Scene > Mesh (If beside that there is an “apply to asset” button, click it)
9. Create IK Rig
-
Inside the
Rigsfolder, create a newIK Rigand select the correspondingskeletal Meshthat was just imported(RMB > Animation > IK Rig) -
Rename the
IK RigtoCharacterName_IKRig -
Open the
IK Rig -
Right click
pelvisbone and clickSet Retarget Root. -
Then with
pelvisbone selected clickAdd New Solverbutton and select the solver optionFull Body Ik -
Select the
Full Body Iksolver, then right-click thepelvisbone and selectSet Root Bone on Selected Solver -
Still with the
Full Body Iksolver selected, right clickhand_lbone and selectNew IK Goal. Do the same for the boneball_l. Repeat for right side bones -
Rename the
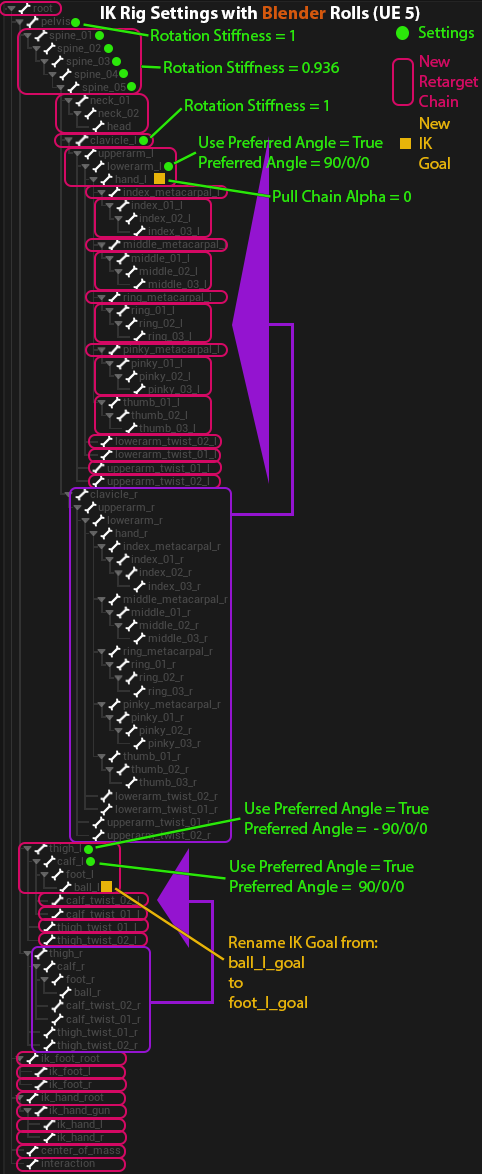
ball_l_Goalgoal tofoot_l_Goal. Repeat for right side bone -
Select the
IK Retargetingtab (left). This is where retargeting chains are displayed. To create retargeting chains, select one or multiple bones in the bone Hierarchy tab on the left, right click them and clickNew Retarget Chain from Selected Bones.Chain all bones together that are surrounded by a red box in this image:
Bone hierarchy screenshot
-
Select
Full Body Ik Sloveragain and right-click the bones with green dots in the image above and clickAdd Settings to Selected Bone. After adding settings, adjust the settings in theDetailspanel to what is seen in the image above. As seen in the picture, thehand_l_goal settingshave to also changed -
Lastly, go to the
IK Retargetingpanel(right). And change followingIK Goals:- For the chain
upperarm_lthe IK Goal =hand_l_Goal - For the chain
thigh_lthe IK Goal =foot_l_Goal - Repeat for right side
- For the chain
10. Create IK Rig for Animation Pack
- Somewhere inside the folder of the animation pack, create a new
IK Rigand select the correspondingskeletal Meshof that animation pack(RMB>Animation>IK Rig) - Rename the
IK RigtoAnimationPackName_IKRig - Open the
IK Rig - Follow steps from section 9.. Apply some common logic when creating the bone chains, the order in which the bones are in will differ as well as the length of some of the chains.
11. Create IK Retargeter
-
Inside the
Rigsfolder, create a newIK Retargeter(RMB>Animation>IK Retargeter) -
Rename the
IK RetargetertoAnimationPackName_To_CharacterName_IKRetargeter -
Open the
IK Retargeter -
Set
Target IKRig Assetto theIK Rigof you character/the character that should recieve the animations (Optionally one can also switch the skeletal mesh, to see the result on different meshes) -
In the
Asset Browsertab you can see the result on animations -
If bone names don’t match up between source and target skeleton, they’ll have to be manually matched in the
Chain MappingTab. If one of the skeletons has more bones, then some chain will have to be unassigned for everything to look correct.If the source is the UE4 skeleton, following
Target Chainswill have to be set to none:- All metacarpal bones (because the UE4 SK doesn’t have them)
lowerarm_twist_02_l(because the UE4 SK doesn’t have them)upperarm_twist_02_l(because the UE4 SK doesn’t have them)lowerarm_twist_01_l(because UE5 procedurally animates them)upperarm_twist_01_l(because UE5 procedurally animates them)
If the source is the UE5 skeleton, everything will match up. Even though they have the same skeleton, the animations will still need to be retargeted.
-
Optionally correct the rest pose now as explained blender-to-unreal-pipeline, if it isn’t already correct
-
Finally, when happy with the result, export the animations. The Export button is at the top of the
Asset Browsertab, select all the animations you want to export and click the button
12. Cleaning Up Animation
If the animation looks kind of off, or you think something can be improved, then tweak values from all prier steps as well as maybe using different chains. If the source and target skeleton are very different, then a lot of tweaking will have to be done until everything looks perfect.
Extended Setup
High Heels
Resources:
- https://www.youtube.com/watch?v=CzbzRevmOhc
- https://forums.unrealengine.com/t/high-heels-and-flat-feet-help/147715
- https://www.reddit.com/r/unrealengine/comments/m1qqk0/highheels_and_non_highheels_animations_help/
- https://forum.reallusion.com/320306/Unreal-4-Retarget-CC-20-Highheel-Flatheel-Characters
Hair Physics
Resources: https://www.youtube.com/watch?v=T5pCaj0trAQ
Breast & But Jiggle Physics
Jiggle physic can either be integrated into the animation, simulated or a combination of both. For physics to work, the rig needs bones and weight painting for breasts and but
Resources:
- https://www.youtube.com/watch?v=BFE5e-XUcwo
- https://www.youtube.com/watch?v=8NB0Z79Gzk8
- https://www.youtube.com/watch?v=kM4owhT2bR8
Accessories & Extra Body Parts (Necklaces, Wings, Tails, …)
WHAT’S NEXT?
The next section (not done yet) will cover how to actually use the animation ready character, either for animations, still renders or as a player controlled character in Unreal Engine 5.
🚧Work in Progress🚧
Route 1 Converting Rigify Rig to Unreal Engine Ready Rig
- Go into Unreal Engine and export the
SKM_Quinn_SimpleorSKM_Manny_SimpleSkeletal Mesh(RMB > Asset Actions > Export) - In Blender set unit scale to 0.01
- Import Simple Quinn or Manny from. In import window: disable
Animations, enableAutomatic Bone Orientation - Select the mesh called
SKM_Quinn_Simple_LOD0. And click the uefy button “Extract Mesh” (If you have light version clear parent(Alt+P) instead) - Delete all other imported objects
- Add in an uefy armature (Shift + A > Armature > Uefy Script > Mannequin Metarigs Presets > Quinn89 Metarig / Manny89 Metarig)
- With the rig selected use the rigify button
Generate Rig(now there should be a rig and a meta-rig) - Select mesh and shift click on rig and parent with
Armature Deform - The character is now ready to animate. Weight paint corrections are also possible (deform bones for weight painting are on layer 24,25,26)
Export & Import Character from Blender to Unreal Engine
- Make sure rig is called “Armature”
- Select entire control rig and all connected objects
- Export as fbx. Make sure to enable “Only Deform bones”, disable “Bake Animations”, disable “Add Leaf Bones” and set “Smoothing Mode” to “Face”
- Pull fbx into Unreal Engine. In the import window: Enable “Skeletal Mesh”, enable “Import Mesh”, disable “Import Animations”, don’t select a skeleton
Character Animations
Export/Import Character Animations From Blender To Unreal Engine
- Go in NLA view and make sure under the rig, all actions are pushed into the NLA strip. Check all boxes and uncheck all stars
- Select entire control rig and all connected objects
- Export as fbx. Make sure to enable “Only Deform bones”, enable “Bake Animations”, disable “Add Leaf Bones”, enable “NLA Strips” and disable “All Actions”
- Pull fbx into Unreal Engine. In the import window: Enable “Skeletal Mesh”, enable “Import Mesh”, enable “Import Animations”, select the correct skeleton
Links
It’s also important to know that this script breaks the rig and makes it no longer usable in Blender, so one should create a backup of the blend file.
Important Notes
- One Skeleton / Rig can be used for many models
Other Method for Already Rigged and Animated Models
Route 1 or Route 2 ?
Now, it’s important to decide if you want to go route 1 or route 2. Route 1 will make the model compatible with every Unreal Engine animation and is recommended. Route 2 is for if you have an already rigged and animated character. Try to avoid route 2 and first generate an Unreal Engine ready rig before weight painting and animating (In short: Route 1 your animations and other animations, route 2 only your animations).
Route 2 Converting Rigify Rig to Unreal Engine Ready Rig
- Set unit scale to 0.01
- Select control rig
- Go to action editor and unlink current action
- Then in pose mode reset all transforms and go back to object mode
- In the
Uefy Script Panellocated in theObject Data Propertiestab, make sureCharacter:has the correct control rig selected (The control rig rigify generates is called rig per default) - …