General Things to Be Aware Of
- Having an efficient workflow between ZBrush and other software is key. More on that here
- It’s good to work on the left side of the model (which is the right side from the character’s perspective). This is because of Mirror and Weld
Subdivision Levels
Something which makes ZBrush quite unique, is how subdivisions work in it. Unlike other software like Blender, there’s actually quite a lot of strategy when it comes to working with subdivision levels. This is because ZBrush doesn’t simply multiply the mesh faces by four and then smooths them (with the Catmull-Clark algorithm), but in addition to that it also remembers every surface change from every subdivision level. This allows for sculpting pores on a face at subdivision level 6, and then go back down to level 2 and change the shape of the face, without destroying the pore detail from level 6.
As a result, ZBrush subdivisions are destructive. Even if one goes back to subdivision level 1 and deletes all higher subdivision levels, the subdivision will have dulled the edges in an irreversible way. This doesn’t matter if one intends to add a subdivision at some point in the future again to that object because this edge dulling effect doesn’t stack.
This can make the mesh unusable as a base for the retopologized mesh and makes changing things later on quite hard. To avoid this issue, either use Dynamic SubDiv or create backups of the object before adding subdivision levels.
So in other words, always use Dynamic SubDivs as long as possible and only switch to the destructive SubDiv when adding detail (this will also help with performance).
Exporting objects with ZBrush subdivisions to other software will mostly make it a normal subdivided object again, but there are methods, like the Blender add-on Sculpt Layers, that can potentially allow for transferring ZBrushes special subdivided objects between ZBrush and Blender.
Finally, ZBrush is excellent at handling millions of poligons, and mostly far more than the software the model will be exported to could handle. So one often has to bake down some of the higher subdivision’s surface detail before leaving ZBrush.
Another little trick with ZBrush’s SubDiv vs. Dynamic SubDiv, is that if you never add SubDiv levels just so the object is smoother but only when you want to sculpt in more detail, then you don’t have to export all objects at insane SubDiv levels, but can disable Dyanmic SubDiv and add a SubDiv back onto the objects that need it. Without accidentaly losing sculpted detail.
More details on the ZBrush’s subdivision system here.
Efficient Alphas & Textures Workflow
Working with alphas in ZBrush can be quite confusing, so here’s everything one should know.
Firstly, the files need to be the way ZBrush wants them. If you want to use them as alphas, the files need to be …
- A single channel image. Most of your alphas will most likely be RGB, and as the name implies are three channel images. The only channel one needs is the gray channel (grayscale).
- A 6bit or 18bit image.
- A .psd file extension (this is quite stupid and hopefully fixed in the future)
If the alpha file doesn’t meet all of these 3 conditions, you might still be able to use the file as an alpha, but you won’t have the benefit of double-click loading the alpha from the Lightbox menu. Instead of loading it into the alpha palette, ZBrush will load it into the texture palette. One can at the bottom of the texture palette menu click MakeAlpha, but this is tedious.
Note that PSD files are larger than PNGs and JPGs, but the size of PSDs isn’t that bad. If the alpha resolution is 4k and one has 2k alphas, then that would be a storage size of:
- PSD = 64 GB
- PNG = 4 GB
- JPG = 1.6 GB
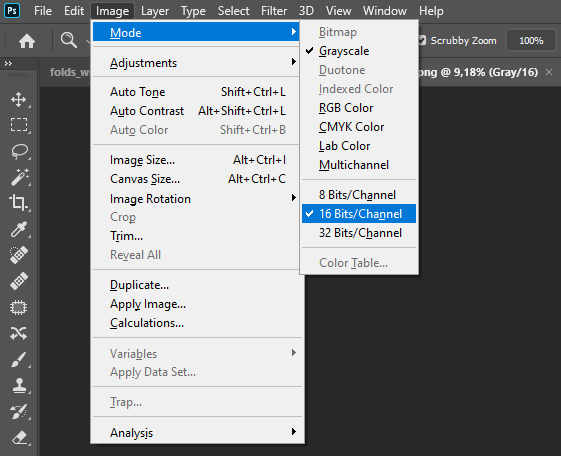
Changing the channels and bit depth in Photoshop:
Batch method (recommended)
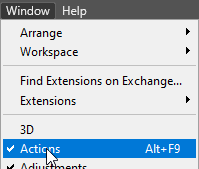
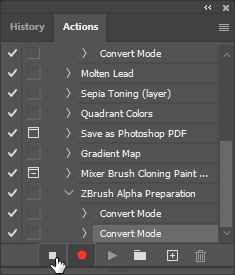
Open action window.
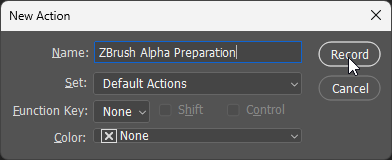
Create and start recording of action.
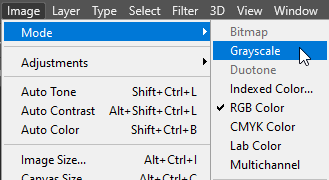
Convert to grayscale.
Convert to 8bit or 16bit channel.
Stop action recording.
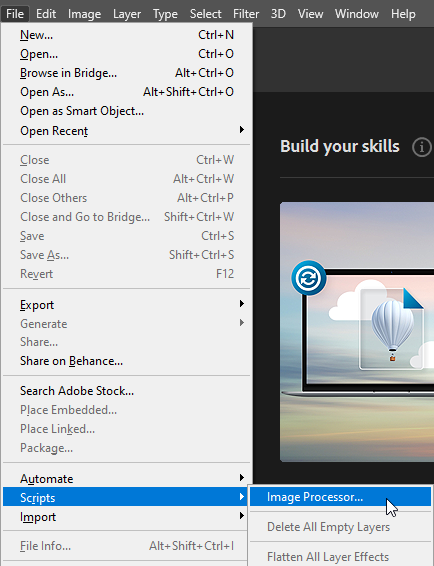
Open Image Processor Script (come with Photoshop)
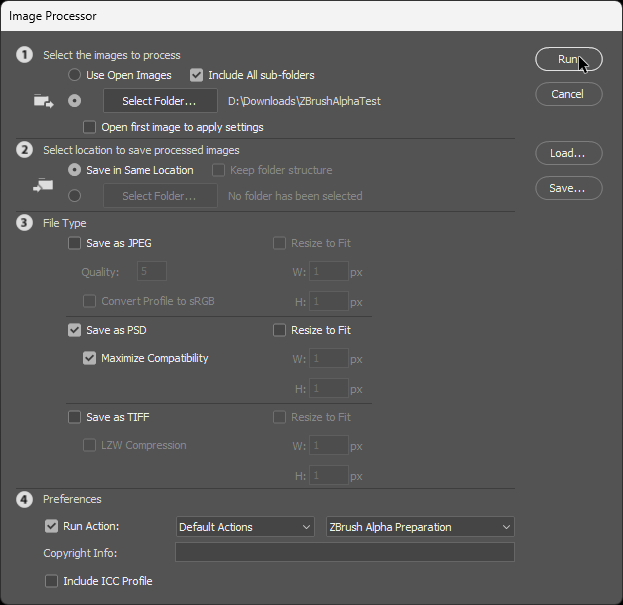
Run Image Processor Script (In menu: Include all sub-folders + Select source folder + File Type PSD + Maximize Compatibility +Run action you just created)
This will create in every folder below the folder you selected a folder called PSD, which contains all the created files. Pull them out of there, replace them with the PNGs or JPGs, and you’re done. Your entire alpha collection should now be grayscaled, 8/16bit PSD files.


Next is the folder structure. I recommend storing the alphas inside ...ProgramFiles/Zbrush/ZBrushes. Inside the ZBrushes folder, create folders for all the themes you have.
For example:
📂ZBrushes
   ├─── 📂Textiles
   │       ├─── 📂Cloth Folds
   │       └─── 📂Zippers, Buttons, Seams, Misc
   ├─── 📂Skin, Fur, Hair
   │       ├─── 📂Human Skin
   │       ├─── 📂Fur
   │       ├─── 📂Scaly Skin
   │       └─── 📂Other Skin
   ├─── 📂Nature
   │       ├─── 📂Rocks
   │       ├─── 📂Tree Bark
   │       ├─── 📂Tree Inner
   │       └─── 📂Damage (not cracks)
   ├─── 📂Industrial
   │       ├─── 📂Hardsurface
   │       └─── 📂Metal
   ├─── 📂Stencils
   │       ├─── 📂Logos
   │       └─── 📂Other
   ├─── 📂Ground
   ├─── 📂Effects
   ├─── 📂Patterns
   ├─── 📂Paint
   └─── 📂Misc
Now that all that is done, it’s time to load the alphas into ZBrush. Open the Lightbox, switch to the Brush tab and choose the alpha you want. Double click it and it should appear in the alpha palette.
It’s good to use the standard brush with the DragRect stroke. Turning off or on backface mask can also be helpful (Brush > Backface Mask).
Brush Types
Overview
ZBrush has so many different types of brushes which are never explained, which can make things quite confusing. So here are all the different types explained.
Alphas can pull out shapes onto the mesh. VMD brushes work similarly, just that they allow for overhangs, so much more complex shapes are possible. Insert mesh brushes place objects on other surfaces, but with some tweaking, they can also become Curve insert mesh brushes for creating objects like chains and ropes. Nano meshes are similar to Insert Mesh Brushes, just that they place the object on every face. This can be very useful for creating patterns or clothing pieces like fishnet stockings. Finally, there are the Normal sculpting brushes, for example Clay Strips or Dam Standard. They store alphas, drag mode as well as other brush related settings and can even have custom preview icons.
Though normal sculpting brushes might seem better than alphas, the big advantage to alphas is that they can be used universally in any software. This allows one to use a sculpting alpha collection for texturing in other software as well. Added to that, it’s a lot less effort to simply use alphas instead of creating a brush out of every alpha.
There is however one quality of life issue, alphas lack in ZBrush. Alphas can’t have a preview of how they look in action. This can be somewhat solved by putting the preview image and the alpha in the same folder, both with the same name, but the preview with an additional suffix like “(preview)“.
Brush file formats
- All brushes use the .ZBP file extension (which stands for ZBrush Preference file)
- All alphas use the .PSD file extension per default but .PNG / .EXR / .TIFF is just as good. Just don’t use .JPG / .JPEG or any other lossy compression types
Brush Save Locations
Here your custom brushes are stored, that load on startup into the Brush Menu (B hotkey). Only put brushes in here that are often used.
Your custom brushes
“YOUR-PROGRAM-FILES”\Zbrush\ZStartup\BrushPresets
Here the default ZBrush brushes ZBrush ships with are stored, that load on startup into the Brush Menu (B hotkey). Don’t touch this folder.
Default ZBrush brushes
…\ZBrush”YEAR”\ZData\BrushPresets
Brushes that are put in the Lightbox brush tab are only loaded when selected, thus not bloating the project file. Added to that, you can create your own folder hierarchy inside the Lightbox brush tab, to organize your brushes.
Lightbox menu brushes
…\Zbrush\ZBrushes
Insert Mesh Brush
This is a brush that contains one or more meshes to chose from. These meshes can then be placed on the SubTool’s surface, or perform boolean operations.
Examples
- Hard Surface Booleans
Creation process
- Make the mesh that should become an insert brush
- Make sure its orientation and scale is correct
- Save the insert mesh (Brush > Create InsertMesh)
Curve Insert Mesh Brush
Is an insert mesh brush, that is made in such a way to seamlessly repeat (array) along a stylus stroke.
Examples
- Chains
- Ropes
- Seams
- Bandages
- Scribe Chisel
Creation process
- Delete top and bottom faces, so there are no internal faces when it repeats
VDM Brush
VDM stands for Vector Displacement Mesh.
Examples
- Dragon Scales
- Sharp Teeth & Spikes
- Insert Ears / Nose / Horns
Creation process
- Switch to a Plane3D Tool (Make PolyMesh3D)
- Sculpt desired detail onto plane. Make sure to not touch the borders of the plane, masking them can help. Alternatively, one can mask everything except for the borders and use
Morph to Grid(Tool > Deformation).Relax Plane Gridcan also help. Also, make sure to sculpt onto the plane from the correct direction. Keep on adding in more planes as SubTools with different detail if you want to- Select a chisel brush
- Make sure that the Tool only contains SubTools that should go into the VDM brush
- Create the VDM brush with
Create MultiAlpha Brush(Brush > Create)- Optional: Give the Brush an icon of the current view (Brush > Alt click on SetIcon)
- Save the VDM brush (Brush > Save As) and give it a fitting name
Alpha Brush
Examples
- Hard surface Detail
- Skin Detail
- Scratch Marks
Fixing Alphas
Sometimes alphas like folds won’t just add folds but also dramatically change the surface curvature. There are
2 fixesto this issue:
- Fix 1 is to change the
MidValueto somewhere around 50. Or enableSurface. In theAlpha > Modifymenu.- Mostly, Fix 1 isn’t enough, so fix 2 comes into play. In Photoshop, go to
Filter > Other > High Passand reduce the value. Optionally, you can also add a levels layer.
Creation process
There are 2 ways of making alphas. The first way is by making them in a 2D software like Photoshop or generating them in software like substance designer. And the second way is by generating them from a 3D mesh.
Sculpting Brush
Examples
- Clay Strips
- Dam Standard
- Inflate
- Move
Creation process
- Clone a brush
- Change its settings
- Save Brush (Brush>Save As) and give it a fitting name
Nano Mesh
Examples
- Patterns
- Fishnet Stockings
- Nets
- Clothing Spikes
Creation process
- Nano Meshes short (Michael Pavlovich) 3 min
- Nano Meshes (Michael Pavlovich) 10 min
- All Michael Pavlovich videos to Nano Meshes
Saving & Backups & ZPR vs. ZTL 💾
Saving strategy
- Save as ZTL every once in a while during the day, as well as clicking the QuickSave button before doing risky actions
- At the end of the day save as ZPR and ZTL
- If during the day ZBrush crashes use auto saves to get back undo history
If you don’t care about history, then only use ZTL and auto saves. And if you do care about history, then still occasionally save as ZTL because it’s not too uncommon for ZPR files to get corrupted or not work on other systems or newer ZBrush versions.
ZPR vs. ZTL
- ZPR = ZBrush Project (Entire Project)
- ZTL = ZBrush Tool (Selected Tool)
Feature ZPR ZTL Tools All Selected Only File Size Big Light weight Undo History ✅ ❌ Project Settings ✅ ❌ Non-Default Materials ✅ ❌ Gird Image Reference ✅ ❌ Morphs Keyframes ✅ ❌ Poly Groups ✅ ✅ Textures, Displacement and Normal Maps ✅ ✅ Poly Paint ✅ ✅ Creasing ✅ ✅ Export Scale & Offset values ✅ ✅
Where are these save methods located?
Save ZPR
File > Save AsSave ZTL
Tool > Save AsYou can also increase the Quick Save Time
Preference > QuickSave > Maximum DurationAuto saves are saved at
???
Check Silhouette 👤
Open the Thumbnail Window and Turn on Silhouette (Preferences > Thumbnail) or switch to the Flat Color MatCap (SubTools need polypaint for this to work properly).
Poly Paint 🎨
Polypaint resources (videos)
Polypainting & Material Painting
About polypaint
- Resolution of mesh affects resolution of polypaint
- Clicking the brush icon beside the SubTool will toggle the polypaint (Colorize) of that SubTool. Shift clicking the icon will do that for all SubTools
- If the SubTool has no polypaint on it or polypaint is disabled for that SubTool, then the SubTool will adjust to the currently selected color
- A SubTool can’t be polypainted on, before it has been filled with a base color
- DynaMesh won’t remove polypaint as long as the paint is visible, it’ll however remove all materials
- ZRemesher will completely remove polypaint and materials
- Unlike polypaint, Material Paint can either be or not be on a face, which makes material transitions rough. To reduce this issue: Hide transitions, increase mesh detail or turn on Render Materials Blend-Radius
- To-Do: Figure out how reprojection plays with poly paint
Working With Color
Use the pre-installed ZColor plugin ZPlugin > ZColor.
- To get all settings, expand the window downwards
- To create a new palette
File > New - To add to your palette, drag from the lower color field onto any color on your screen. Then right-click the lower color field and
Add to Swatches - To save your palette
File > Save - To name colors within the palette, double click beside the color
- To re-position colors within the palette, drag them up and down
- To delete colors from the palette, right click delete colors (will only work when Direct mode is off)
Set Colorwill set your color in ZBrushDirect mode(triangle button) will automatically set your color in ZBrush when you select a color from the swatchFill Object mode(paint bucket button) fills the selected SubTool with the selected ZColor color (Fill Object mode synergizes with Direct mode)
ZColor doc here.
- To sample color within ZBrush use C
Polypaint Setup Process
- Select the
PaintBrush (Or Select theStandardbrush, set its channel toRgband disableZadd/Zsub) - Select the
Smoothbrush, disableZadd/Zsub - Fill SubTool with base color (Color > FillObject)
- Make sure a plain MatCap is selected (Material Tab)
Paint with materials
Works the same as color painting.
To paint with materials, switch to the brush channel M, fill the object with that material (FillObject) and then you can freely switch to other materials and paint with them.
Painting Options
The paint options are in the Draw, Color and Stroke tab. Almost all sculpt options apply to painting as well.
- Color (Color > Color Selector, Clicking on the Main or Secondary Color will open of the color selector window in big)
- Switch Colors (
SwitchColorswitches between main and secondary color,Alternatemakes Alt key switch between the 2 colors) - Color Picker (C key picks color on screen)
- Opacity (Draw > Rgb Intensity)
- Stroke Type (Dots, DragRect, Spray)
- Brush Alpha
Rendering 📷
Rendering in ZBrush resources (videos)
Rendering info
- The render resolution is the size of the ZBrush document
Render Settings
- Antialiasing (SPix)
- Subsurface Scattering (Sss)
- Shadows
- AOcclusion
- Materials Blend-Radius
- Wax Preview: Only for preview mode
Lighting in ZBrush
To-Do
Document Size
How to get rid of the empty document border?
Whenever ZBrush is on a different monitor resolution, or you change that monitor’s scale size, you’ll have to redo the following steps (something I despise).
- In the Documents Menu toggle
WSizeand clickNewDocument- Now your canvas will be empty, to get back your SubTools drag on the Canvas once and press T. The angle at which you pull out your tool and how big you pull it, is completely irrelevant and won’t mess up your tool
- So ZBrush always opens at this resolution, click
Save As Startup Docin the Document menu
Configuring UI ⚙️
- Enable
Configure UIand do changes - Then store the UI for yourself somewhere
- Finally click
Store Configso ZBrush starts with that UI - There are situations where ZBrush doesn’t start with your UI, in that case click
Load UI
The process is the same for Hotkeys and Color Themes.
Using My Interface
My ZBrush configs are here, you only need the interface file.
For the interface, if the size of the display you use for ZBrush is 1920 x 1080, you’re ‘good to go. If not, then you’ll need to adjust the document size, so you don’t have massive gray borders around your 3D viewport (video about that here).
The main thing about this interface is that I made a custom menu with every tool in it that is often used, sorted into groups. The menu is at the top and called “MyInterface”, I recommend giving it some hotkey you’ll never press and then in the driver settings for your tablet, mapping that hotkey to the back button of your stylus.
Errors ❌
"Too many items in AllList" error
Q A Info - Latest recorded version: ZBrush 2022.0.1
- Happens when saving ZPR (entire project)Fix Save file without history, or delete Tools and SubTools you don’t need anymore (Isn’t a good fix). Cause Unknown Possible cause File size to big (started happening around the 2.3 - 2.5GB mark for me). What isn’t the cause - Amount of SubTools (tested 400)
- Amount of Tools (tested 40)
- Amount of polygons in SubTools (tested 150 mil)What does it do It makes ZBrush immediately crash the next time you or ZBrush quick or manual saves.
ZBrush file extension is .ZZZ instead of .ZTL
ZZZ files are temporary ZBrush files, it’s how ZBrush names ZTLs while it’s writing into them (saving). When the file extensions stays .ZZZ after the process has finished, it means something went wrong while saving and the file is most likely corrupted. The corrupted file is as far as I know unfixable.
🚧Work in Progress🚧
- Use dynamic SubD as long as possible to keep the ZBrush file small