🚧Work in Progress🚧
Foreword
For more information about how meta-rigs slot into the field of rigging, take a look at the overarching rigging page.
As a quick recap from what was said on the rigging page, the purpose of meta-rigs is to act as blueprints for control-rigs. Any improvement one might have in mind for the control-rig, is something that one has to change in the meta-rig.
Overview
A lot of theory about meta-rigs is software-independent. I’ll go over things using Blender 4.x for now, but will at some point also add Maya approaches.
As we’ll be using rigify to generate the control-rig, the meta-rig should be compatible with rigify. The best way of doing this is by starting with rigify’s “Human (Meta-Rig)” (Add > Armature) and then adding to that the bones that one still needs for the character. There’s nothing special about this pre-made meta-rig, and one can easily replicate it with rigify’s meta-rig building blocks, but sticking with the pre-built rig can reduce the chance of errors when generating the game-rig.
In addition to using the pre-built blocks, one can also simply use vanilla Blender rigging methods in the rigify meta-rig, by marking those bones appropriately, but more on that later.
You can add as many bones as wish to rigify’s Human meta-rig template, those added bones can be freely parented to any other bone. Just make sure not to delete any of the pre-existing bones (even if you don’t need them, like when your character only has one arm), add new bones into pre-existing bone chains and re-parent the pre-existing bones. The only exception to that is the face, if you don’t need to animate the character’s face, then delete all the face bones from the meta-rig, including the bone called “face” hiding inside the “spine.006” bone. Following those rules will prevent most of the issues that can arise with rigify’s generate rig button, as well as making the game-rig creation easier, if that’s something you’ll be doing.
Before we continue, I recommend looking into this video series by CG Dive, for a better base understanding on how to customize meta-rigs with rigify or even create them from scratch with rigify’s meta-rig building blocks.
name me
Before placing the bones, make sure to enable X-Axis mirror as well as In Front (Outliner > Data > Viewport Display). When placing the bones, use Snap to Face (Shift + Tab) to quickly place bones where they roughly should be.
There are a couple of things to watch out for when editing the meta-rig, which if neglected will result in mistakes in the control-rig.
- The roll value shouldn’t be changed and should stay as close to the values of the default rigify meta-rig. When placing bones, the roll will however change. The legs and all center bones for example need a roll of 0, so make sure to set their roll value to that.
- All the heads and tails of all leg bones have to line up in a straight line on the X axis.
- The bones that connect to form the knee, have to point forwards on the Z axis.
Also make sure to use the Upgrade Face Rig button, this will improve deformations, add quite a lot of features to many of the face bones in the meta-rig, improve widget visuals and significantly increase the Re-Generate Rig button loading time, making it near instant.
ToDo: How to add hair spine 06 and rig type and layers
Hair, Eyes, & Jaw Setup in the Meta-rig
Hair For hair, simply create bone chains that start at the root or some place to the top of the hair and extend them down to the tip of the hair. Having more bones in the bone chain will allow for more fine teaks of the strand, but will make the posing take longer and can also add unnecessarily many bones, which isn’t desired in game engines. For key hair strands close to the face, it can make sense to give individual strands their own chains, but for hair strands more to the back of the head one should one chain be responsible for many strands.
After all the bones are placed, the uppermost bone of every hair bone chain needs to be parented (Ctrl + P) to the “spine.006” bone as well as assigned the “basic.copy_chain” Rig type (Properties > Bone > Rigify Type > Rig type).
Eyes & Jaw Rigify won’t generate bones for the eyes and jaw in the control-rig as it excepts for the user to bind the mesh with the control through parenting. This is a terrible approach for a couple of reasons, the main one being that game engines only recognize weight painting.
So one has to assign the “basic.super_copy” Rig type (Properties > Bone > Rigify Type > Rig type) to the “eye.L”, “eye.R”, “teeth.B” and “teeth.T” meta-rig bones.
An interesting take on bone placements
This was written by bandages and is a somewhat long read, but well worth it.
Bones need to be placed at the centers of rotation, rather than the exact bone locations.
The place where this is the biggest issue is with the spine. Your organs can only compress/extend so much, so when you bend forward, your vertebrae kinda expand or something (they’re separated by more flexible discs). What happens is that you don’t literally rotate around the position of the spine bones, but much more centrally than that.
You can see this pretty easily by trying to rig a model and placing the spine realistically. Arching the back will make the front of your torso seem to expand unnaturally. In reality, there are actually a lot of different things going on, it’s not a simple rotation about some point, but the closest simple abstraction is that your body is rotating about some point somewhat forward (“anterior”) of your spine.
Other places, the center of rotation is at the location of the bone. Compression isn’t a big issue for knees, and the ankle ends up maintaining a constant distance from roughly the center of the leg. (Not necessarily true near the joint itself though.)
The actual directions that bones point doesn’t really matter— Blender’s “tails” don’t matter. They’re used to establish autoweights and they’re used for local axes, and they can be used by some constraints. But the only important thing for the final model is where the head is. One of the things that means is that you should feel to rotate tails however you want to get the autoweights you want. So should your spine rotate with your model? If your model is modelled with a straight back, your spine bones should be in a straight line! If your model isn’t (modelled with near-porn back arch, say) then your spine bones aren’t going to be in a line. The important thing is where bones are rotating about, relative to how the mesh has been modelled.
Now, if you look at an actual human being, and ask them to wiggle their jaw, what you’ll find is that the jaw maintains a roughly constant distance from the temporomandibular articulation. So for a realistic model, that’s where the jaw needs to rotate about, or that’s where a parent of distal child bones like “chin” needs to rotate about. That doesn’t mean that autoweights from a bone running from the temporomandibular to the chin will give you good autoweights near the joint itself. That’s a different issue.
But the way I think about it is, you don’t see bones on character models. You see flesh. This whole idea of “bone” is just a metaphor. That’s why you don’t model forearms as an ulna/radius pair. You don’t care about the ulna and the radius. You care about the muscles which are attached to the bones, the skin that is stretched over those muscles, and that has different behavior than the bones themselves. So you don’t have twin long bones, you have short twist bones.
For bone placement relative to the surface of the skin, the important thing to recognize is first, that armatures are merely simplified abstractions; second, that bone placement for autoweights and for posing are different things. In reality, the clavicle connects the scapula and the sternum. It doesn’t control all shoulder movement; the scapula is much more influential. But how many models have scapulae? Few. The entire model is controlled by a simplified scapula/rib/humerus/clavicle structure. Where should that rotate about? In reality, you’d have multiple rotation points and complicated constraints connecting them. In reality? The scapula is generally ignored, while more care is taken for the clavicle, which rotates about the articulation with the sternum, more anterior than posterior. Mostly, not because that’s real, but because we don’t care about our model’s back— we’re not looking at it very often. (And in my experience, getting good scapula deformation is a real chore. It’s one of those places where there’s a lot of skin sliding, which skeletal deformation isn’t built to simulate.)
But autoweights are something different. How do they work? The closer the line representing the bone is to the surface of the mesh, the sharper the weights are going to be. They’re going to work best if you maintain the origin of the bone, but you can do autoweights and then shift the tail afterwards to your heart’s content, so you can manipulate the sharpness of weights. This makes some sense: if you’re placing your clavicle, place it near the skin, and it’ll mimic a superficial clavicle deforming the skin, while it’ll deform the scapula only very generally and loosely, in conjunction with the spine and arm bones.
All that is just my experience. I don’t want to pretend like I’m an expert rigger. I have plenty to improve. Don’t treat it like it’s authoritative.
I won’t say too much more regarding bone placements as the text above is quite comprehensive, but one thing to consider, is that many people will quite heavily rely on automatic weights. For anyone who uses automatic weights, placing the spine in the center of the body is essential, so the weighting algorithm can evenly place the weights. But if one anyway does weight painting by hand, as one should, then that shouldn’t be a reason to place the spine in the center of the body, and rather, one should be thinking about bone reaction points when placing bones. That doesn’t mean however that there aren’t other benefits of placing the spine in the center of the body, as bandages mentioned above.
Looking at reference of skeletons or people in poses can help with placing the bones.
Supporting Bones
The most bare bone meta-rig that would be able to move everything would be structured like this:
- Two arm bones
- Two leg bones
- A couple of spine bones
- Some neck bones
- A head bone
- A hand bone
- A bone for every finger joint
- Two foot bones (one for the main part of the foot and one for the toes)
This meta-rig would allow for everything to move normally, but it wouldn’t look very good. The thing that’s missing are supporting bones. Examples of supporting bones are:
- Clavicle bone
- Scapula bone (rarely present in rigs, and difficult to implement but important if back deformation is key)
- Arm twist bones (A replacement for the twin bone twist system (Ulna & Radius) in our body. Even though the upper arm bone (Humerus) doesn’t have this, it doesn’t hurt to also give it the twist bones)
- Palm bones (helps with poses like fists and spreading out all the fingers)
- Pelvic bone (makes the leg bone have less influence of the hip area)
- Extra hip area support bone
- Breast bone (only for females, to get a realist breast movement)
- But bone (not to common but can make sense)
Note that some of these aren’t that important and are used to improve the result of automatic weight algorithms.
Of those, the rigify meta-rig includes the clavicle, arm twist, palm, pelvic and breast bones. The arm twist bones won’t be visible at first in the meta-rig, but will appear in the generated control-rig (This behavior can be modified or disabled. Select the upper arm bone in pose mode and go to Outliner > Bone > Rigify Type. Setting Limb Segments to 1 will disable arm twist.)
Meta-rig part examples
I’ll show how to do it with vanilla blender rigging tools as well as via the rigify meta-rig building blocks, if a building block exists that can be used for that.
Usage examples
- Earrings
- Hanging lantern
- Keys hanging from a belt
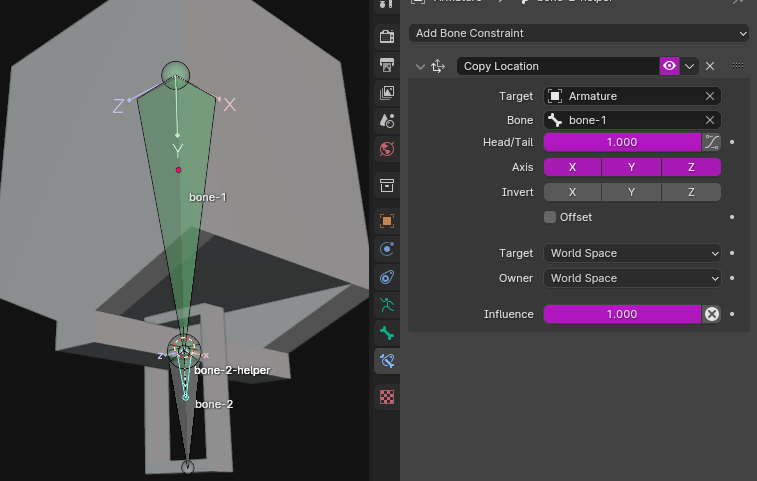
None of the bones are connected, “bone-2-helper” copies the location of “bone-1” head, but as it can’t move on its own, “bone-2” is created that is parented with keep offset to the “bone-2-helper”. Turn off deform for “bone-2-helper”.
Usage examples
- Harpoon / hook with chain weapon
- Firefighter hose
- Fishing rod
- Cables
- Ropes
Bone Naming Conventions
ToDo
Add In
Also, if the rig is meant for game engines, try to use bones more sparingly.
For clothing and accessories of the character or things like hair and body physics one
Some examples of things one might require extra bones for, are hair and body physics, extra body parts like more than two arms, a tail, an extra set of ears or clothing parts that require bones.