Overview
Preparing the model properly is essential before moving on to baking and texturing. The following things are part of the preparation process and will be covered in full detail:
- Fixing mesh topology
- Normals & shading
- UV unwrapping
- Naming objects and file
- Color id mapping setup (if desired)
- Proper export
Great Resources
Great Polycount Pages
- Understanding averaged normals and ray projection
- Making sense of hard edges, UVs, normal maps
- Bit Depths, Banding and Normal Maps
- Making sense of skewed normal map details
Other Great Pages
Mesh & Topology
Make sure to follow the concepts mentioned on the Topology and Retopology page.
Some baking specific topology advice
- Try to keep the silhouette of the high and low mesh as close to each other as possible
- Try to merge as many low objects together as possible. Not only merging the meshes into the same object, but also connecting the polygons. This will reduce poly count, increase texture space and make weight painting as well as animating so much easier. Every once in a while do a test bake and see if there are objects that need to be separated for clean baking results. Merging the high meshes doesn’t matter and will only help make the outliner less cultured.
- Delete all polygons that aren’t seen, sometimes this means adding in a bit of extra edge flow / cuts to remove more faces. This makes the mesh use less texture space, meaning the texel density of all the UVs that are actually seen can be increased. A good trade, totally worth the slight increase in polygons that the cuts may create, as texture space is more valuable than poly count.
- Triangulate the high mesh and make sure the low has no Ngons. Every software triangulates differently, so Triangulating in the modeling software instead of auto triangulation in Marmoset will avoid issues. This however comes with the con of not being able to nicely showcase the wireframe. So one should only Triangulate the high. When you notice quads on the low are triangulating badly, manually triangulate those quads in the modeling software. (If you’re using Maya, you may want to lock the mesh normals first, as the mesh normals change upon triangulation.)
- Try to strategically use SubDiv modifiers. SubDiv modifiers will often be the cause for badly baked edges. For parts that don’t play a big role in the silhouette SubDiv is fine
Normals & Shading
Normals and shading are critical and will dramatically alter the bake if handled incorrectly. For starters, bakers like Marmoset Toolbag use the normal direction as the baking angle, as shown in this video:
 video by Marmoset Toolbag
This will result in normals pointing in the wrong direction like this:
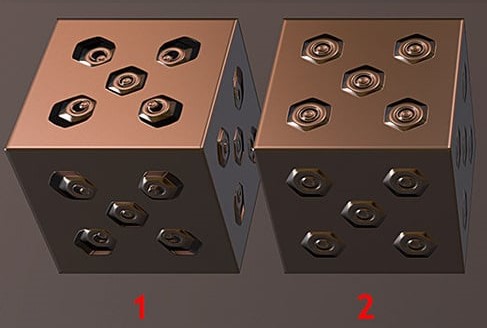 (1 bad normals, 2 good normals) image by EarthQuake
Marmoset Toolbag has a way of somewhat fixing this. By painting on a skew map one can re-orient the normal / skew direction to be at a 90° angle to the face. This solution is however tedious and won’t work well on curved surfaces. So try to import the mesh with the best possible skewing, and fix the remaining problematic areas with this method.
More on skewed normals in this Polycount article. (I don’t fully agree with the statement, that adding edge loops to control shading is the best solution for the low mesh in the game industry.)
Other issue that bad normals & shading will cause are square grid patterns in the textures (in the shape of the topology from the low) as well as black spots.
The ultimate rule of thumb
A smoothing split always needs a UV split, but a UV split doesn’t always need a smoothing split.
Smoothing / Shading (articles, videos)
Following things will manipulate normals:
- Shading
- Baking cage
- Normal direction
- Skews
Shading
How the shading is done on the high doesn’t matter as long as the shading looks good. Most of the time shade smooth or no shading will give good results for hard surface objects, if the result has issues then the normals at those spots need to be manually manipulated until the result is as desired.
Hard Surface After UV unwrapping, select the seams and mark them as sharp edges. This works for almost all seams. There will however be some seams where the sharp edges should be removed again, on flat surfaces for example. Then turn on auto smooth or use Hard Ops. Problems can often be resolved by setting smooth angle to 100°. If the shading looks bad at the center mirror point of some objects, add a sharp edge along the center line.
Organic To-Do
Baking cage
The cage helps for ray casting to know from where to cast the rays and when to kill the ray. The cage should extend far enough to cover the highest points of the high poly mesh. The cage is almost always a bigger and solidified version of the low and should never be done by hand, if the baker doesn’t generate a cage for you then that baker isn’t a good baker. Making cages isn’t hard, but when working with many objects it’s a complete waste of time. Marmoset and Substance generate cages, bakers in Blender and Maya currently don’t.
Sometimes however with more complex objects the generated cage won’t work, then one can either:
- Hand paint the cage distance
- Import a custom cage
- Split the object into separate parts
Normal direction
Normals should always be pointing outwards.
In Blender, normals can be manipulated with the Normals menu (Alt + N). Recalculate Outside (Shift + N) almost always works
Skews
To-Do (real-time editing of normals)
UV Unwrapping
Look at the UV Mapping page.
Naming Conventions
The name indicates the low and high match, however it doesn’t indicate what is put on the same texture atlas, that depends on what was exported together in the same file or what material was assigned to the objects. One can also add further numbers at the end to indicate that multiple highs match with one specific low and vice versa. Use software built-in batch re-namers to quickly rename everything (Ctrl + F2 in Blender).
Some of the naming conventions are:
- End with ”…low” or can also be ”…low…”, and same for “high” (Marmoset)
- Keywords like “low” and “high” aren’t case-sensitive
- 1 / 01 / 001 all work for numbering as long as it’s consistent, but it’s good to pad the number with one or two zeros as a suffix, so the object sorting in a scene is the same in every software (An 11 could be sorted above an 8, as 8 comes after 1, but some software might be smart enough to notice that they are a number sequence and sort 8 before 11.)
- Adding no number is fine if there’s only one low and high
For example
(“p” is short for part)
Lows: Armor_p014_low (mostly the low will only have one piece) Armor_p015_low
Highs: Armor_p014_high_001 Armor_p014_high_002 Armor_p014_high_003 Armor_pt015_high
Other things one could add to the name would be helpful descriptors like texture resolution and texture sheet number, as well as if the low part doesn’t need to be baked.
Color ID Mapping
Color ID mapping is a convenience step which makes masking in the texturing phase easier and more precise, yielding better results. Note however that they can also have the opposite effect because of having to fiddle with masking the colors and the initial setup needed to be able to render them. For more organic models, hand painting masks while texturing is often faster without a drop in quality. So in general, doing this step depends on personal preference and the project at hand.
When baking the color ID maps, make sure the colors are flat, so no anti-aliasing. If the baker doesn’t support that, Substance Painter has a tolerance slider for the ID map, which is fine as a last resort. The colors should also be as unique as possible from each other.
Baking color ID maps
Method 1 (Materials): Assign different materials to parts of the topology, color can be blank for all. Then import into baker / texturing software, make sure to have export materials on. For this method, the Object ID map needs to be baked
Method 2 (Vertex Colors): Select faces in edit mode, then switch to vertex paint mode and toggle mask selected faces. Then press Shift + K to fill with selected color. To keep colors consistent, add them to the vertex color palette.
(I’ve only done this in Marmoset Toolbag, but it should work quite similarly in other baking software like Substance Painter)
Materials
- The high object needs a blank material, bakers like Marmoset Toolbag will, however, do this for you
- Remove all materials from both low and high before export. Alternatively, one can also delete them in the baker or disable material export
Floaters
Floaters can make the AO maps look bad around the borders of floaters by creating height offsets and messing up light ray paths from the baker. This can be solved by placing the floater not in the air above the mesh, but in such a way that it’s a part of the mesh. It’s also important to make sure that floaters have the exact angle of the surface below them.
Exporting
- Export all high objects that should be on the same atlas in one FBX file, do the same for the low in a separate file (
Armor_low.objArmor_high.obj) - Only the mesh, UVs and normals are needed (And optionally: Materials / Vertex colors on the low, for the Color ID map)
Export File Types:
File format comparisons (articles)
| Features | FBX | OBJ | gITF | Alembic |
|---|---|---|---|---|
| Normals | ✅ | ✅ | ✅ | ✅ |
| UVs | ✅ | ✅ | ✅ | ✅ |
| Triangulate at export | ✅ | ✅ | ||
| Size | #2 | #1(Up to 5 times smaller (smaller than what???)) | ||
| Export time | ||||
| Import time | ||||
| Vertex Color | ✅ | ✅ | ✅ | |
| Material(limited) | ✅ | ✅ | ✅ | |
| Texture | ||||
| ~ | ~ | ~ | ~ | ~ |
| Bones | ✅ | |||
| Animation information | ✅ | ❌ | ✅ | ✅ |
| Kinematics | ||||
| Keyframes | ||||
| Skinning | ||||
| ~ | ~ | ~ | ~ | ~ |
| Lighting | ✅ | |||
| Camera | ✅ | ❌ | ✅ | |
| Scene hierarchies | ✅ | ❌ | ✅ | |
| NURBS | ✅ | |||
| Clean Up | Resets rotation, scale and position to 0,0,0. Deletes all vertex information, unused UVs and vertex groups | |||
| ~ | ~ | ~ | ~ | ~ |
| Web browser compatibility | bad | very good | ||
| Open to use / Not a blackbox | ❌ | ✅ |