Info
Make sure to have read the Baking and Texturing Preparations before baking for the best result.
Where to Bake
Marmoset Toolbag yields the best bakes and has the best tools for troubleshooting bakes. It’s also able to bake highs with extremely high polycounts (50-100 mil) without crashing. Substance Painter also gives acceptable results, but one has a lot less control over the bakes. Stay away from most bakers that are integrated in 3D modeling software, Blender being a good example of that. It’s possible to bake in it with some add-ons. But the results are so bad and the workflow is totally unoptimized. In short, of you care about your time and sanity, don’t bake in Blender.
Reasons for Ambient Occlusion Maps Looking Bad
- High poly mesh not high enough
- Not enough samples
- Adjust ignore groups (located under every high object)
- Not enough AO rays
- Not enough texture resolution
- Bad preparation. Baking and Texturing Preparations
If your AO map has grid like lines, it’s because the low mesh isn’t high enough. If one then however increases the topology resolution of the low mesh, it fixes the grid line issue, but creates new problems, like terrible looking edge bevels in the AO map. This is indeed such a big problem, that not even Riot Games has clean AO maps for their League of Legends champions. This is the AO map from Pyke’s mount; Nensi.
Example of Riot Games Messing Up Their AO Maps
If you want to take a look for yourself, you can officially download the model and texture maps for Pyke and Akali from Riot’s page.
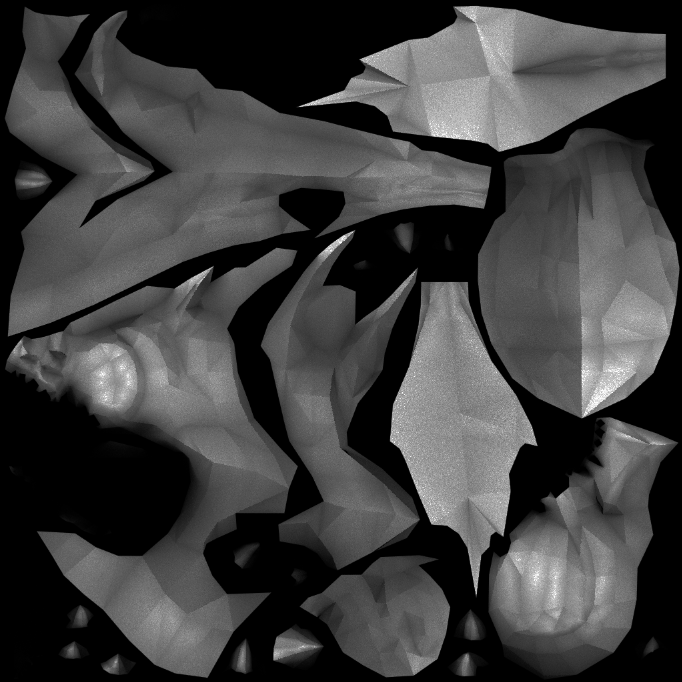 (The image was brightend for better visualization)
As you can see, the low mesh face polygons are visible in the AO map. Resulting in nasty grid like lines all across the texture.
I have come up with a fix, however. The trick is to do 2 bakes of the AO map, one with everything as it should be, and then another bake with every high object having extra subdivisions. This will most likely make the high look bad at some spots, but that doesn’t matter. Then, when we have the 2 AO maps, we open them in Photoshop or any alternative as 2 layers. The desired AO map at the top and the AO map with subdivisions below. Then add a black mask to the top layer and paint flat surfaces that have the grid problem with white. This will make the smooth surface of the subdivisions AO map shine through. Use gray tones, as well as a mix of harder and softer brushes when painting, to get nice transitions between the 2 AO maps.
This issue doesn’t just arise with AO maps, but other maps as well. So import all the other affected maps with their high subdivision pair and reuse the same mask used for the AO map before, instead of repainting the mask for all maps.
Reasons for Normal Maps Looking Bad
- Badly baked corners can be a result of not enough texture resolution
- Use of SubDiv
- Bad preparation. Baking and Texturing Preparations
What Passes to Use
General Passes
- Normals
- Ambient Occlusion
- Curvature
- Thickness
- Position
- Object ID (optional)
- UV Shell / Island (optional)
Other Passes
- Color (called “Albedo” in Marmoset)
- Metallic (called “Albedo(Metal)” in Marmoset)
- Roughness (Use “Roughness” or “Gloss” depending on where you plugged the texture into)
- Bloom
- Alpha Mask
- Wireframe
These passes are only needed if one wants to do texturing in Marmoset or is working with a textured High Poly model that should be baked down to a Low Poly model.
A Great Way to Bake Normals for Every Situation
Use 32bit Open EXR, if the software doesn’t support that, use PSD or 32bit PNG. Make sure the image is made of floats and not bytes in Blender, this is visible behind the channels. Also, always go for 32bit even if you don’t want the final normal map to be 32bit.
If a 32bit channel is the desired bit depth for the texture map, then you’re done. If not, open it in PS or CSP and change the bit depth mode from 32bit to desired bit depth, make sure to switch the method to Exposure and Gamma. This down-resing will result in terrible dithering, which can easily be removed. In Photoshop, select the color bucket and set the color to R:128 G:128 B:255 (gray), then set the tolerance to 10 and turn off both Anti-alias and Contiguous. Then color fill the flat space which is blue.
Marmoset Specific Baking
Official Marmoset baking guide
Texture Map Setup
Texture Map Setup
This isn’t needed for most normal map baking workflows
- Gloss is roughness inverted, so check invert beside gloss or switch gloss to roughness
- 32bit EXR, need linear color space
What Settings to Use?
Bake Settings
Use low settings for test bakes
- Turn on Multilayer PSD when using PSDs
- Bit depth: 32
- Samples: 64
- Dither: Off (turn on for low bit depths)
- Ray count: 512
- Floor Occlusion: 1
- Ignore groups: ?
- Two sided: Off
- Padding:
- Padding Size:
- Soften:
Skews
Skews is a Marmoset only feature that allows for the normals to be edited real-time and immediately shows the re baked result. This however doesn’t replace the initial correction of normals.
Skews can be toggled in the low menu and can be edited there as well. Editing the skew will make it red and make the normal point in a 90° angle from the face. The skew should (if at all) be painted at spots where screws, rivets and other detail is baked.
Marmoset automatically creates skews by looking at the face normals of the low poly mesh and the cage normals. However, one can also manually edit the skews with a paint mask.
- When painting skews, often white spots that don’t need it need to be painted so the AO looks correct
Things to Be Aware of in Marmoset
- Sometimes when re-baking or auto importing the modified mesh, the wrong normal map will be displayed. Re-toggle the preview and when that doesn’t help delete the preview material
- Only use smoothed cage (default cage)
- Use Mikk / xNormal as the tangent space (default tangent space)
- When one wants to use 8bit one should turn Dither on which removes banding by adding noise. For 16bit, Dither shouldn’t be on and to bake as 32bit, one needs to switch the bake extension to PSD
- If Marmoset is hard lagging it most likely is because quick bake is on
- If the origin isn’t at the center of the object, the skews will be way too long (only affects interface)
- Marmoset bakes on the right side per default. So one either has to work on the right side (which is good habit) or have everything mirrored
- Be aware of the option to hide meshes. When toggled, everything that’s hidden won’t be used for the bake
🚧 Stuff to Add
ToDo: Go over use of baking in the film industry